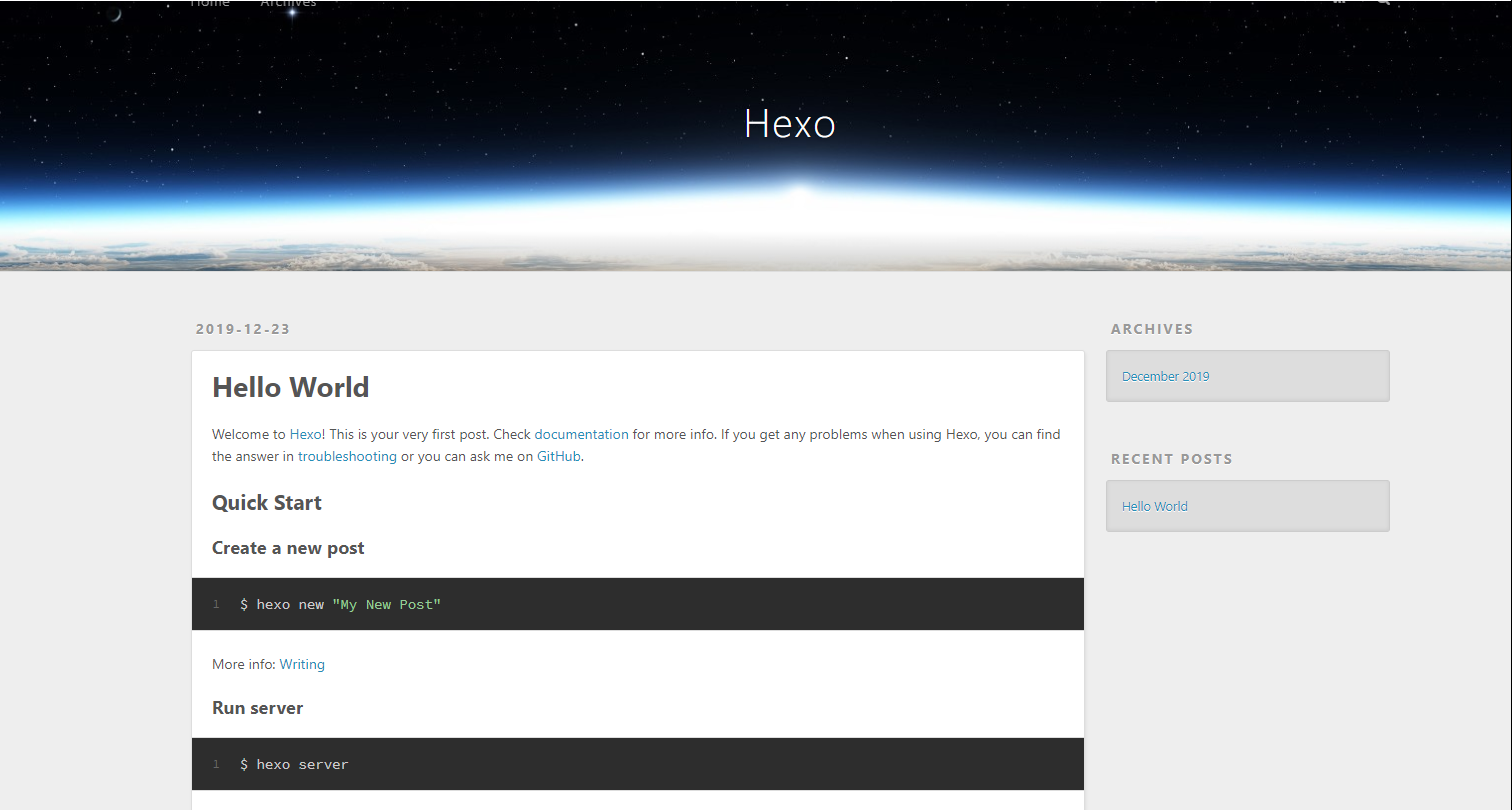
hexo博客上线
博客又双叒叕上线了,这次使用的是hexo + Github Pages + travis CI + 语雀 + serverless + onedrive图床,部署完成之后可以直接在语雀上编辑文章然后自动发布到博客,云端写作不是梦hhh
部署
部署部分是按照博客https://www.simon96.online/2018/10/12/hexo-tutorial/ 配置的,仅做备份之用以便日后博客迁移可以照着这篇文文章重新恢复(ಥ _ ಥ)
本地环境:windows Linux Ubuntu 18.04
(可选)配置git
首先我得重新在git设置一下身份的名字和邮箱(因为当初都忘了设置啥了,因为遇到坑了)进入到需要提交的文件夹底下(因为直接打开git Bash,在没有路径的情况下,根本没!法!改!刚使用git时遇到的坑。。。)
1 | git config --global user.name "yourname" |
注:yourname是你要设置的名字,your@email是你要设置的邮箱。
安装 Node.js和npm
1 | sudo apt-get update |
如果报错,请更改软件源—清华大学开源软件源,并更新
注:查看nodejs和npm版本号
1 | nodejs -v |
可以正常打印版本号说明,安装成功
安装 Hexo
创建博客所在目录
1
mkdir hexo
创建目录
1
mkdir hexo
切换目录
1
cd hexo
全局安装 Hexo,需要最高权限,记得输入root密码
1
sudo npm install -g hexo-cli
初始化 Hexo
1
hexo init
注:如果报错执行代码,不报错忽略
1
2
3sudo npm config set user 0
sudo npm config set unsafe-perm true
sudo npm install -g hexo-cli
安装插件
如果安装慢就安装proxychains,并且定义alias npm=’proxychains4 npm’
如果要永久定义(重启不失效的话就编辑:
1
vim ~/.bashrc
并且在末尾添加以下代码并定义 alias
1
alias npm='proxychains4 npm'
配置完代理后就可以安装npm插件了
1
2
3
4
5
6
7
8
9
10
11
12
13
14
15
16
17
18
19
20npm install hexo-renderer-pug hexo-renderer-stylus --save
npm install hexo-generator-index --save
npm install hexo-generator-archive --save
npm install hexo-generator-category --save
npm install hexo-generator-tag --save
npm install hexo-server --save
npm install hexo-deployer-git --save
npm install hexo-deployer-heroku --save
npm install hexo-deployer-rsync --save
npm install hexo-deployer-openshift --save
npm install hexo-renderer-marked --save
npm install hexo-renderer-stylus --save
npm install hexo-generator-feed --save
npm install hexo-generator-sitemap --save
npm install hexo-tag-aplayer --save
npm install aplayer --save
npm i --save hexo-wordcount
npm install aplayer --save
npm install --save hexo-helper-live2d
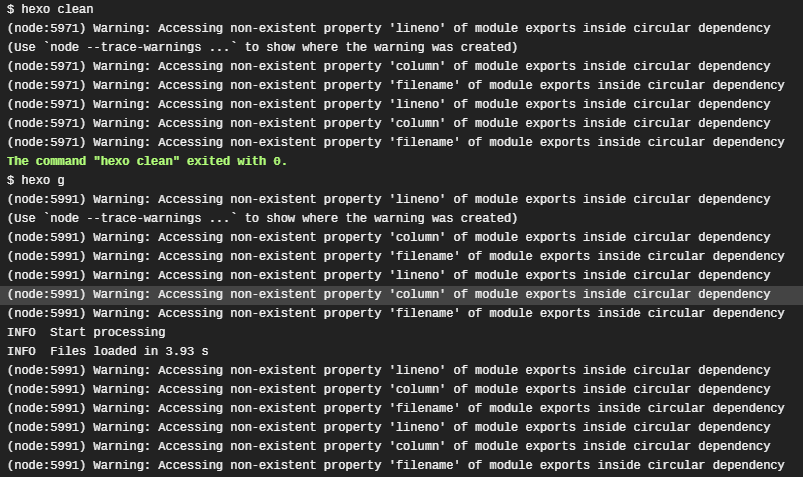
测试安装成功
1 | hexo g && hexo server |
同步到githubpages
方案一:GithubPages
创建Github账号
创建仓库, 仓库名为:
.github.io 将本地Hexo博客推送到GithubPages
安装hexo-deployer-git插件。在命令行(即Git Bash)运行以下命令即可:
1
$ npm install hexo-deployer-git --save
添加SSH key。
创建一个 SSH key 。在命令行(即Git Bash)输入以下命令, 回车三下即可:
1
$ ssh-keygen -t rsa -C "邮箱地址"
添加到 github。 复制密钥文件内容(路径形如C:\Users\Administrator.ssh\id_rsa.pub),粘贴到New SSH Key即可。
测试是否添加成功。在命令行(即Git Bash)依次输入以下命令,返回“You’ve successfully authenticated”即成功:
1
2$ ssh -T [email protected]
$ yes
修改_config.yml(在站点目录下)。文件末尾修改为:
1
2
3
4
5
6# Deployment
## Docs: https://hexo.io/docs/deployment.html
deploy:
type: git
repo: [email protected]:<Github账号名称>/<Github账号名称>.github.io.git
branch: master注意:上面仓库地址写ssh地址,不写http地址。(windows使用git的话建议用https,可以挂代理)
推送到GithubPages。在命令行(即Git Bash)依次输入以下命令, 返回INFO Deploy done: git即成功推送:
1
2$ hexo g
$ hexo d等待1分钟左右,浏览器访问网址:https://
.github.io
至此,的Hexo博客已经搭建在GithubPages, 域名为https://
方案二:GithubPages + 域名
在方案一的基础上,添加自定义域名(购买的域名)。
域名解析。
类型选择为 CNAME; 主机记录即域名前缀,填写为www; 记录值填写为<Github账号名称>.github.io; 解析线路,TTL 默认即可。仓库设置。
- 打开博客仓库设置:https://github.com/
/ .github.io/settings - 在Custom domain下,填写自定义域名,点击save。
- 在站点目录的source文件夹下,创建并打开CNAME.txt,写入你的域名,保存,并重命名为CNAME。
- 打开博客仓库设置:https://github.com/
等待10分钟左右。
浏览器访问自定义域名。 至此,Hexo博客已经解析到自定义域名,https://<Github账号名称>.github.io依然可用。
主题,插件配置
主题
hexo博客主题用的是butterfly,配置信息:https://jerryc.me/posts/21cfbf15/ ,感谢作者~
插件
插件部分引自博客https://www.simon96.online/2018/10/12/hexo-tutorial/ ,仅做备份之用以便日后博客迁移可以照着这篇文文章重新恢复(ಥ _ ಥ)
live2d
安装插件
1
npm install --save hexo-helper-live2d
复制你喜欢的模型名字:
Epsilon2.1

Gantzert_Felixander

haru

miku

ni-j

nico

nietzche

nipsilon

nito

shizuku

tsumiki

wanko

z16

hibiki

koharu

haruto
Unitychan

tororo

hijiki

将以下代码添加到主题配置文件
_config.yml,修改<你喜欢的模型名字>:1
2
3
4
5
6
7
8
9
10
11
12
13
14
15
16
17
18live2d:
enable: true
scriptFrom: local
pluginRootPath: live2dw/
pluginJsPath: lib/
pluginModelPath: assets/
tagMode: false
log: false
model:
use: live2d-widget-model-hijiki
display:
position: right
width: 150
height: 300
mobile:
show: true
react:
opacity: 0.7建配置文件
在站点目录下建文件夹
live2d_models,再在
live2d_models下建文件夹<你喜欢的模型名字>,再在
<你喜欢的模型名字>下建json文件:<你喜欢的模型名字>.model.json
安装模型。在命令行(即Git Bash)运行以下命令即可:
1
npm install --save live2d-widget-model-hijiki
在命令行(即Git Bash)运行以下命令, 在
http://127.0.0.1:4000/查看测试结果:1
hexo clean && hexo g && hexo s
评论插件(2021年9月12日更新)
- 博客评论采用gitalk,配置过程参考https://github.com/gitalk/gitalk/blob/master/readme-cn.md
- 创建 GitHub Application的时候需要注意一下,url填个人博客的完整地址。
进阶配置
github actions自动构建(2021年9月12日更新)
由于不经常用语雀(就是懒),再加上travis ci要求构建的库必须是公共库,所以转战github actions。
创建
blog仓库用来存放 Hexo 项目创建
your.github.io仓库用来存放静态博客页面
生成ssh密钥
1
ssh-keygen -f github-deploy-key
会生成
github-deploy-key和github-deploy-key.pub两个文件。配置部署密钥
复制
github-deploy-key文件内容,在blog仓库Settings -> Secrets -> Add a new secret页面上添加。- 在
Name输入框填写HEXO_DEPLOY_PRI。 - 在
Value输入框填写github-deploy-key文件内容。
复制
github-deploy-key.pub文件内容,在your.github.io仓库Settings -> Deploy keys -> Add deploy key页面上添加。在
Title输入框填写HEXO_DEPLOY_PUB。在
Key输入框填写github-deploy-key.pub文件内容。勾选
Allow write access选项。
- 在
编写 Github Actions
Workflow 模版
3.1 在
blog仓库根目录下创建.github/workflows/deploy.yml文件,目录结构如下。1
2
3
4blog (repository)
└── .github
└── workflows
└── deploy.yml3.2
在
deploy.yml文件中粘贴以下内容。1
2
3
4
5
6
7
8
9
10
11
12
13
14
15
16
17
18
19
20
21
22
23
24
25
26
27
28
29
30
31
32
33
34
35
36
37
38
39
40
41
42
43
44
45
46
47
48
49
50
51
52
53
54
55
56
57
58
59
60
61
62
63
64
65
66name: CI
on:
push:
branches:
- master
env:
GIT_USER: HPShark
GIT_EMAIL: [email protected]
THEME_REPO: HPShark/happyshark
THEME_BRANCH: master
DEPLOY_REPO: HPShark/HPShark.github.io
DEPLOY_BRANCH: master
jobs:
build:
name: Build on node ${{ matrix.node_version }} and ${{ matrix.os }}
runs-on: ubuntu-latest
strategy:
matrix:
os: [ubuntu-latest]
node_version: [14.x]
steps:
- name: Checkout
uses: actions/checkout@v2
- name: Checkout theme repo
uses: actions/checkout@v2
with:
repository: ${{ env.THEME_REPO }}
ref: ${{ env.THEME_BRANCH }}
path: themes/concise
- name: Checkout deploy repo
uses: actions/checkout@v2
with:
repository: ${{ env.DEPLOY_REPO }}
ref: ${{ env.DEPLOY_BRANCH }}
path: .deploy_git
- name: Use Node.js ${{ matrix.node_version }}
uses: actions/setup-node@v1
with:
node-version: ${{ matrix.node_version }}
- name: Configuration environment
env:
HEXO_DEPLOY_PRI: ${{secrets.HEXO_DEPLOY_PRI}}
run: |
sudo timedatectl set-timezone "Asia/Shanghai"
mkdir -p ~/.ssh/
echo "$HEXO_DEPLOY_PRI" > ~/.ssh/id_rsa
chmod 600 ~/.ssh/id_rsa
ssh-keyscan github.com >> ~/.ssh/known_hosts
git config --global user.name $GIT_USER
git config --global user.email $GIT_EMAIL
- name: Install dependencies
run: |
npm install
- name: Deploy hexo
run: |
npm run deployname是当前 Action 的名字,最后你可以在仓库的 Actions 菜单项中看到它。on是此 Action 触发条件,当满足条件时会触发此任务,上面的 on.push.branches.source-action是指当 source-action 分支收到 push 后会触发 Action 执行任务。env为环境变量对象env.GIT_USER为 Hexo 编译后使用此 git 用户部署到仓库env.GIT_EMAIL为 Hexo 编译后使用此 git 邮箱部署到仓库env.THEME_REPO为 Hexo 所使用的主题的仓库,这里为 vensing/Kratos-Rebirthenv.THEME_BRANCH为 Hexo 所使用的主题仓库的版本,可以是:branch、tag 或者 SHAenv.DEPLOY_REPO为 Hexo 编译后要部署的仓库,例如:vensing/vensing.github.ioenv.DEPLOY_BRANCH为 Hexo 编译后要部署到的分支,例如:master
jobs为此 Action 下的任务列表jobs.{job}.name任务名称jobs.{job}.runs-on任务所需容器,可选值:ubuntu-latest、windows-latest、macos-latest。jobs.{job}.strategy策略下可以写 array 格式,此 job 会遍历此数组执行。jobs.{job}.steps一个步骤数组,可以把所要干的事分步骤放到这里。jobs.{job}.steps.$.name步骤名,编译时会会以 LOG 形式输出。jobs.{job}.steps.$.uses所要调用的 Action,可以到 https://github.com/actions 查看更多。jobs.{job}.steps.$.with一个对象,调用 Action 传的参数,具体可以查看所使用 Action 的说明。
在上面配置文件中的代码段,指定了 Action 依赖的 OS 实例为 ubuntu-latest,以及 node 运行环境版本为 14.x,任务 steps 中引用了一个 版本为 v2 的 Action checkout ,actions/checkout@v2 的作用是 Checkout 一个 git 仓库到当前 ubuntu 容器。
- Checkout theme repo step 中从环境变量中拿出 $ 指定本站使用的博客仓库名及分支 hexo5-custom,检出到 themes/Kratos-Rebirth 目录下。
- Checkout deploy repo step 中从环境变量中拿出 $ 指定部署备份的博客仓库,及要部署备份生成的静态网页的分支 master,检出到 .deploy_git 目录下。
- Use Node.js step 中使用了 actions/setup-node@v1 action 指定了 node 的版本。
检出主题分支和 Github Pages 部署分支之后,接着配置执行环境:
- 设置容器的时区;
- 将在 Settings -> Secrets 中的 SSH 私钥写入到 ~/.ssh/id_rsa 文件中;
- 设置 id_rsa 的文件权限及 know_hosts、git 全局用户信息
接着执行 npm install 安装依赖和 npm run deploy 部署到 Github Pages 进行备份。run: | 可分行连续执行多条命令,需要注意的是使用 hexo 的 deploy 命令需要我们安装 hexo-deployer-git 依赖,所以需要先在本地安装下依赖写入 package.json 中。
执行任务
写一篇文章,
push到blog仓库的master分支,在此仓库Actions页面查看当前 task。
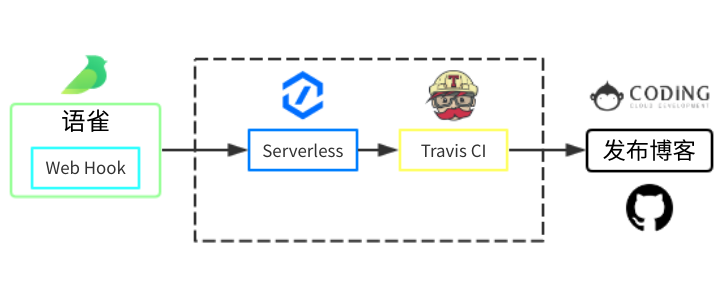
语雀云端写作+腾讯云serverless提交+ Travis-ci自动构建+github-pages发布
目前博客使用github action发布,好处是源代码仓库可以设为
私有,而travis-ci构建的代码仓库必须是公开,所以这一部分的配置已经废弃~实现语雀云端协作部分引自博客https://www.itfanr.cc/2017/08/09/using-travis-ci-automatic-deploy-hexo-blogs/ 以及https://aqpcet.coding.me/%E8%AF%AD%E9%9B%80+TravisCI+Serverless/3689364350.html ,仅做备份之用以便日后博客迁移可以照着这篇文文章重新恢复(ಥ _ ಥ)
语雀
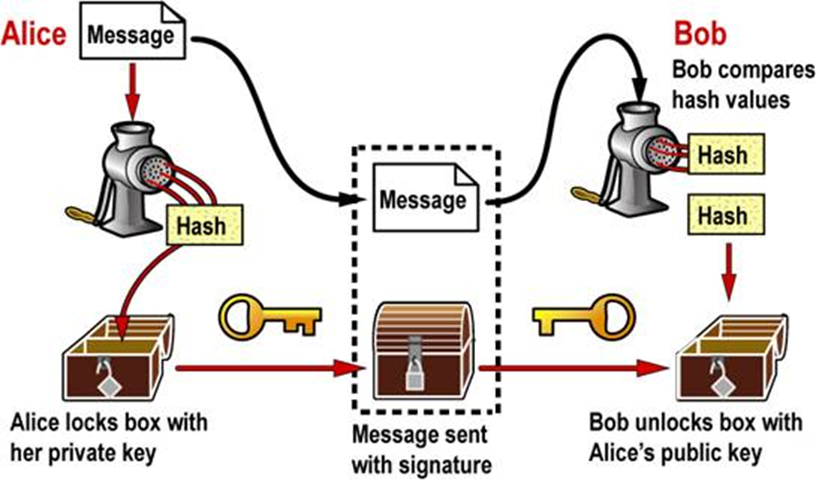
语雀是阿里巴巴旗下的专业云端知识库,支持Markdown语法,个人和团队皆可用于文档编写。它不仅仅是一个在线编写文档的工具,还集成了Web Hook ,为自动化部署Hexo建立了基础。而yuque-hexo是x-cold根据语雀的API为Hexo博客写的插件,可以很方便的将语雀指定知识库里的文章全部更新到hexo博客中。
Serverless
Serverless可以通过代码唤起Travis CI执行构建项目。
自动部署总体流程如下。
关键文件:
.travis.yml:(参考自IT范儿)
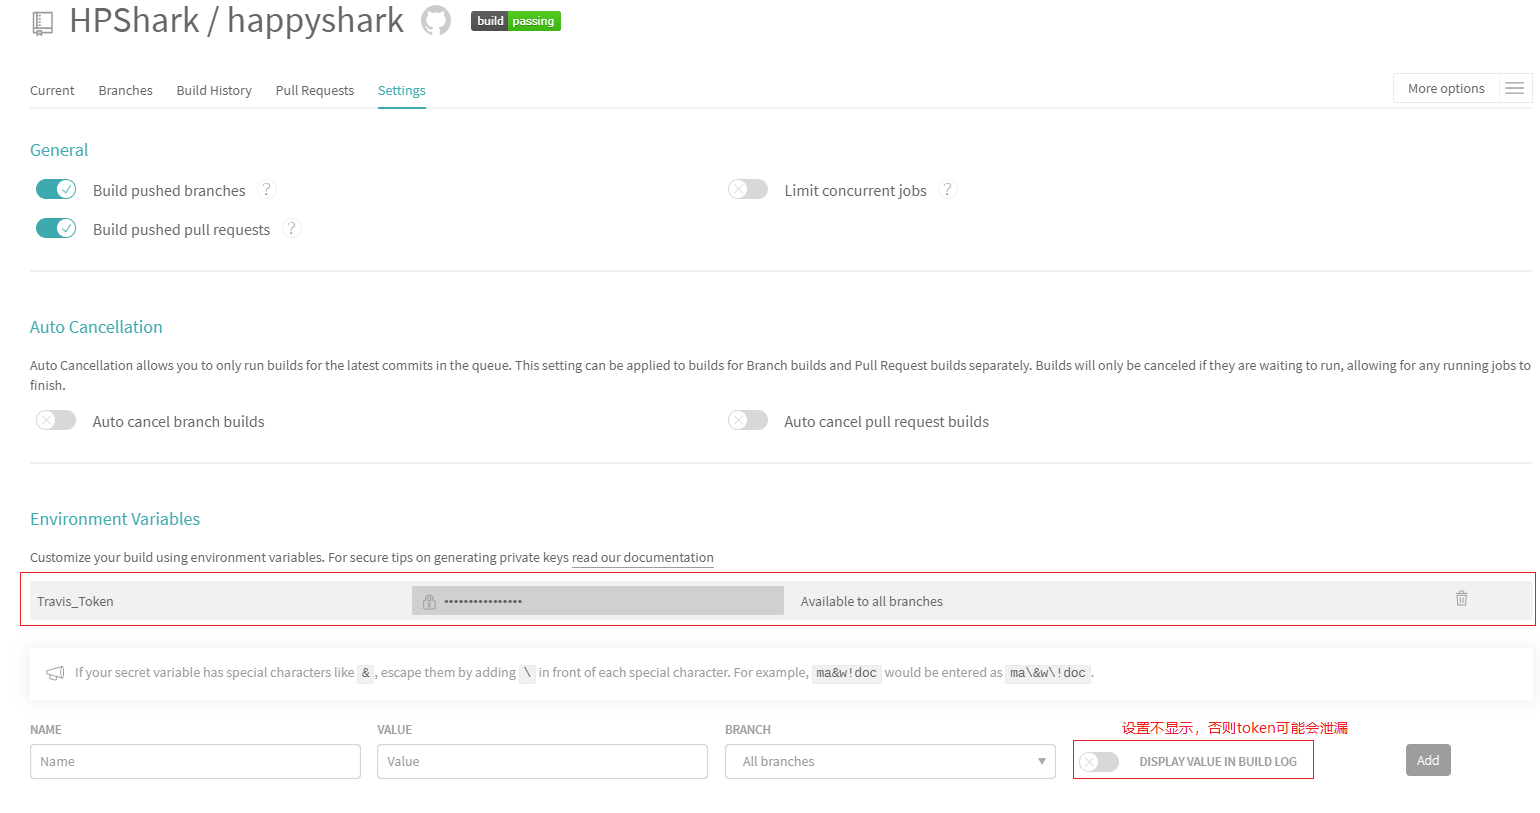
如果使用这两个问卷配置travis-ci的话,travis-ci.com上仓库的设置里面环境变量只需要设置Travis_Token,变量值为github上取得的Token(DISPLAY VALUE IN BUILD LOG一定要关上!)
20200324更新:语雀会对频繁调用的请求进行限流,故需要将语雀token加入到该文件中。${YUQUE_TOKEN}即为语雀token,为保证安全故将token值加进travic网站中而不保存在文件中,添加方法与Travis_Token添加方法相同
1 | language: node_js # 设置语言 |
publish-to-gh-pages.sh:
1
2
3
4
5
6
7
8
9
10
11
12
13
14
15#!/bin/bash
set -ev
git clone https://${GH_REF} .deploy_git
cd .deploy_git
git checkout master
cd ../
mv .deploy_git/.git/ ./public/
cd ./public
git config user.name "HPShark" # 修改name
git config user.email "<github登录邮箱>" # 修改email
# add commit timestamp
git add .
git commit -m "Travis CI Auto Builder at `date +"%Y-%m-%d %H:%M"`"
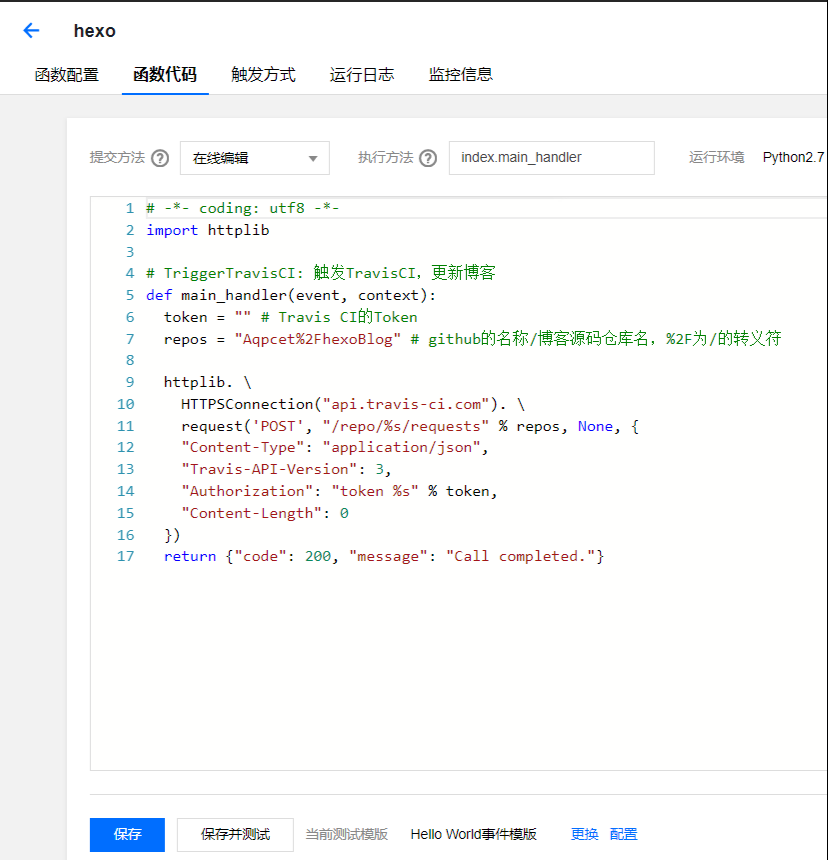
git push --force --quiet "https://${Travis_Token}@${GH_REF}" master:master腾讯云serverless函数配置,因为travis-ci.org的网址换成了travis-ci.com,所以要对网上的一些老版本的函数内容中的api部分进行修改,然后再加上token和repos即可
1
2
3
4
5
6
7
8
9
10
11
12
13
14
15
16
17
18
19
20
21
22
23
24
25
26
27
28
29
30
31
32
33
34
35
36
37
38
39
40
41
42
43
44
45
46
47
48
49
50
51
52
53
54
55
56
57
58
59
60
61
62
63
64
65
66
67
68
69
70
71
72
73
74
75
76
77
78
79
80
81
82
83
84
85
86
87
88
89
90
91
function main_handler($event, $context) {
// 解析语雀post的数据
$update_title = '';
if($event->body){
$yuque_data= json_decode($event->body);
$update_title .= $yuque_data->data->title;
}
// default params
$repos = ''; // 用户名%2F源码仓库名,斜杠用%2F代替
$token = ''; // 你的登录token
$message = date("Y/m/d").':yuque update:'.$update_title;
$branch = 'master';
// post params
$queryString = $event->queryString;
$q_token = $queryString->token ? $queryString->token : $token;
$q_repos = $queryString->repos ? $queryString->repos : $repos;
$q_message = $queryString->message ? $queryString->message : $message;
$q_branch = $queryString->branch ? $queryString->branch : 'master';
echo($q_token);
echo('===');
echo ($q_repos);
echo ('===');
echo ($q_message);
echo ('===');
echo ($q_branch);
echo ('===');
//request travis ci
$res_info = triggerTravisCI($q_repos, $q_token, $q_message, $q_branch);
$res_code = 0;
$res_message = '未知';
if($res_info['http_code']){
$res_code = $res_info['http_code'];
switch($res_info['http_code']){
case 200:
case 202:
$res_message = 'success';
break;
default:
$res_message = 'faild';
break;
}
}
$res = array(
'status'=>$res_code,
'message'=>$res_message
);
return $res;
}
/*
* @description travis api , trigger a build
* @param $repos string 仓库ID、slug
* @param $token string 登录验证token
* @param $message string 触发信息
* @param $branch string 分支
* @return $info array 回包信息
*/
function triggerTravisCI ($repos, $token, $message='yuque update', $branch='master') {
//初始化
$curl = curl_init();
//设置抓取的url
curl_setopt($curl, CURLOPT_URL, 'https://api.travis-ci.com/repo/'.$repos.'/requests');
//设置获取的信息以文件流的形式返回,而不是直接输出。
curl_setopt($curl, CURLOPT_RETURNTRANSFER, 1);
//设置post方式提交
curl_setopt($curl, CURLOPT_CUSTOMREQUEST, "POST");
//设置post数据
$post_data = json_encode(array(
"request"=> array(
"message"=>$message,
"branch"=>$branch
)
));
$header = array(
'Content-Type: application/json',
'Travis-API-Version: 3',
'Authorization:token '.$token,
'Content-Length:' . strlen($post_data)
);
curl_setopt($curl, CURLOPT_HTTPHEADER, $header);
curl_setopt($curl, CURLOPT_POSTFIELDS, $post_data);
//执行命令
$data = curl_exec($curl);
$info = curl_getinfo($curl);
//关闭URL请求
curl_close($curl);
return $info;
}
部署过程
源码上传至github
- 建一个新的仓库,专门存放源代码(也可以直接在github.io 的那个仓库新建一个分支,不过设置麻烦,就放弃了)
- 将本地代码上传(可能有信息安全风险,所以建议为博客单独开设一个帐号)。注意仓库要设为公开,travis-ci构建私人仓库是要付费的orz..
注意事项:
上传前建议先执行hexo clean,可以减少上传体积。
也可以通过配置.gitignore控制上传内容
1
2
3
4
5
6
7.DS_Store
Thumbs.db
db.json
*.log
node_modules/
public/
.deploy*/
配置travis-ci
把.travis.yml和publish-to-gh-pages.sh放在根目录
登录travis-ci,绑定github,允许访问github仓库,进入博客源码仓库

设置Environment Variables(环境变量),设置Travis_Token,YUQUE_TOKEN添加方法类似
配置完成后等待腾讯云serverless触发即可构建,构建成功会return 0,如果有其他问题(一般是缺环境)缺啥在.travis.yml中的install那里npm装包即可~
腾讯云serverless函数配置:
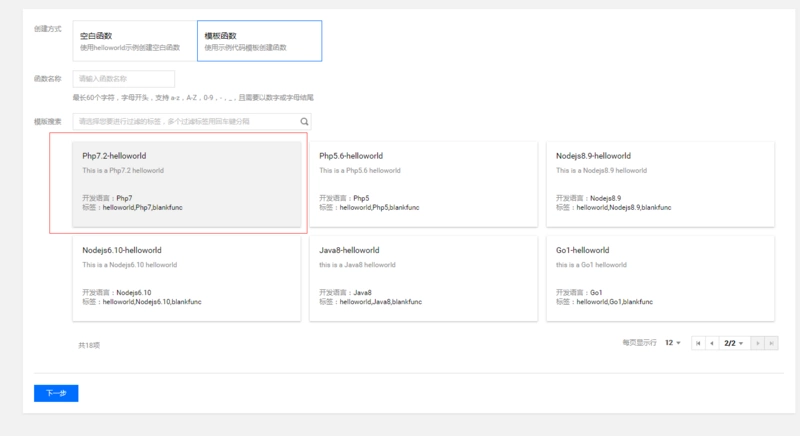
新建php空白函数:(可以用python,aqpcet.coding.me用的就是python设置的)
编辑serverless函数内容,需要获取以下两个信息,填入对应的地方就行
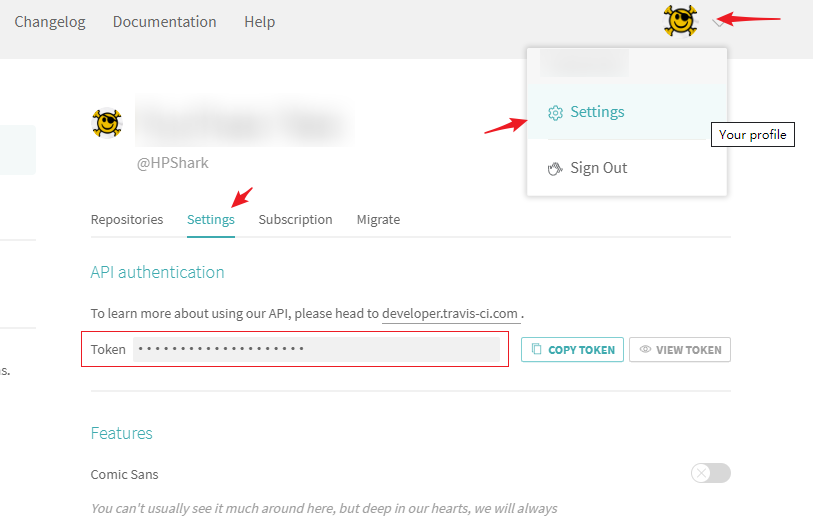
travis登录token,在travis-ci.com中设置界面获取:
博客源码的仓库名
现在可以直接用\
%2F<博客源码仓库名>代替原来的仓库id了,不用在拿抓包工具抓仓库ID 或 扩展名了
配置触发方式
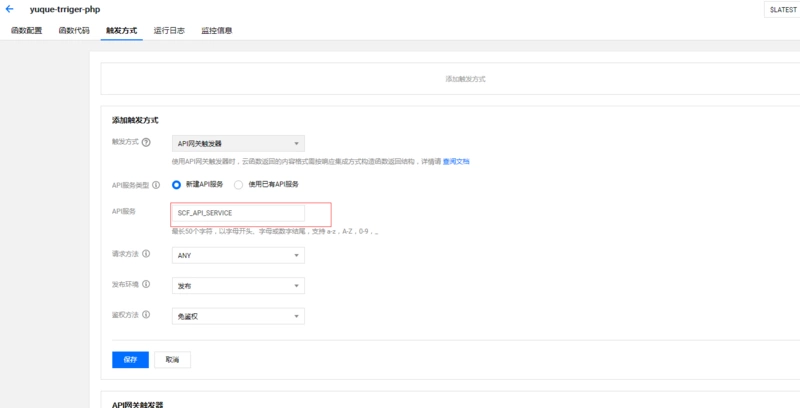
一般会得到这么个api:https://service-s08f6nvk-1251833201.ap-guangzhou.apigateway.myqcloud.com/release/xxx
语雀配置:
配置一个仓库的webhook:
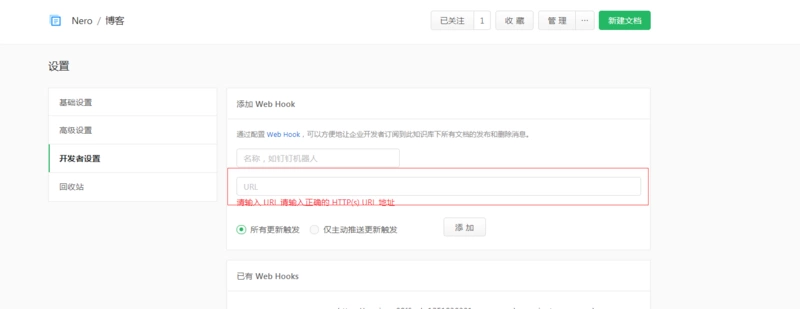
可以选择所有更新触发或者主动触发,主动触发的意思即发布需要勾选一个选项才会触发webhook。具体可参见语雀文档:https://www.yuque.com/yuque/developer/doc-webhook;
将serverless生成的api填入,可以在链接后面带参数:1
2
3
4
5
6
7token 登录token
repos 仓库id
message 提交信息
branch 分支
示例:
https://service-s08f6nvk-1251833201.ap-guangzhou.apigateway.myqcloud.com/release/xxx?repos=xxx&token=xxx&message=xxx&branch=xxx如果不在链接带参数则写在serverless函数内。
通过语雀插件对front-matter进行处理
插件地址:https://github.com/x-cold/yuque-hexo
需要对package.json,.travis.yml进行配置,在编辑语雀文章时头部要这么写:
1 | tags: [hexo, node] |
注:冒号后面是空格!tags后面必须有中括号!有时候同步完之后空格会变成tab造成front-matter无法被插件识别,就会出现front-matter重叠的情况issues#45
大功告成!在语雀上正常发布一篇文章即可自动触发serverless函数提交给travis-ci构建博客
一些坑
serverless python版
私人图床:onedrive
使用方法非常简单,具体步骤如下:
注册账户,已有的可直接略过。
登录OneDrive,上传需要外链的图片。
在图片上右键选择“嵌入”按钮,再在弹出的窗口中点击“生成”选项。
将链接复制到需要展示的地方。
来自 https://osk.ink/archives/12/
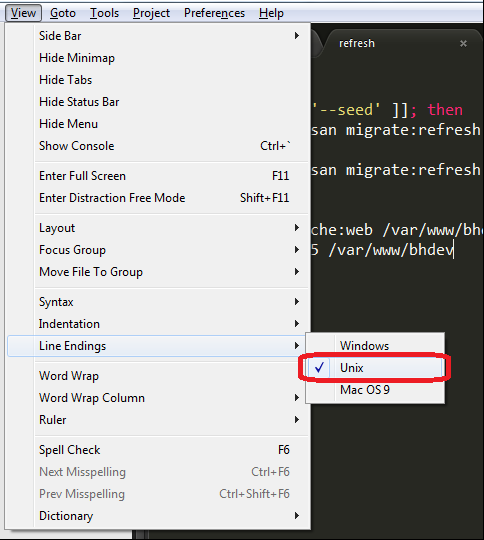
travis渲染时报错:
travis /bin/bash^M: bad interpreter: No such file or directory
If you use Sublime Text on Windows or Mac to edit your scripts:
Click on View > Line Endings > Unix and save the file again.
原因:编码问题,如下解决即可
Ubuntu安装Proxychains
Proxychains是Linux上一款全局代理工具,通过Hook Socket函数实现透明代理,这和Windows上的Proxifier有点类似。 在Ubuntu上安装Proxychains的方法是:
1 | apt-get install proxychains |
安装的是3.1版本,配置文件的路径是:/etc/proxychains.conf,内容如下:
1 | # proxychains.conf VER 3.1 |
Proxychains支持HTTP(HTTP-Connect)、SOCKS4和SOCKS5三种类型的代理,需要注意的是:配置代理服务器只能使用ip地址,不能使用域名,否则会连不上。
Proxychains支持3种模式:
- 动态模式 按照配置的代理顺序连接,不存活的代理服务器会被跳过
- 严格模式 按照配置的代理顺序连接,必须保证所有代理服务器都是存活的,否则会连接失败
- 随机模式 随机选择一台代理服务器连接,也可以使用代理链
如果不需要代理DNS的话,可以注释掉proxy_dns这行。
使用的时候在命令行前加上proxychains即可。
1 | root@ubuntu-pc:~# proxychains telnet [www.baidu.com](http://www.baidu.com) 80 ProxyChains-3.1 ([http://proxychains.sf.net](http://proxychains.sf.net/)) Trying 14.215.177.37… |R-chain|-<>-10.0.0.10:8080-<><>-14.215.177.37:80-<><>-OK Connected to [www.a.shifen.com](http://www.a.shifen.com). Escape character is ‘^]’. |
它的目的是设置LD_PRELOAD环境变量,以便创建的新进程会加载libproxychains.so.3,这个so的作用是Hook Socket函数。因此,也可以在当前shell中执行:
1 | export LD_PRELOAD=libproxychains.so.3 |
这样之后执行的命令都会使用代理访问。
不过这个版本有个问题,配置代理后所有的连接都会走代理,包括对回环地址的访问。这并不是我们所期望的,幸好有个版本提供了解决方案。
1 | git clone https://github.com/rofl0r/proxychains cd proxychains ./configure make make install |
安装后在配置文件中加入:
1 | localnet 127.0.0.0/255.0.0.0 |
安装后的命令是proxychains4,因此可以和旧版本命令并存。这样对于回环地址就可以绕过代理,使用直连了。
相对于Proxifier而言,这种方式还是弱了一点,毕竟有时候我们还是需要根据不同的情况使用不同的代理服务器。
有东西传不到github上去?
删掉.deploy_git:
1 | - rm -rf .deploy_git/ |
语雀防盗链解决办法:
临时方案是直接在 html 模版中添加 head 进行绕过
1 | <meta name="referrer" content="no-referrer" /> |
(来自 https://github.com/x-cold/yuque-hexo/issues/41 )
注:对于butterfly主题的话对themes\Butterfly\layout\includes\layout.pug修改head部分即可,但是会造成网站访客数和文章阅读数无法加载
gem失败
apt-get install ruby-dev
Windows 的 Linux 子系统的文件同步和 Windows 不是实时的问题
如果使用windows子系统的Ubuntu的话,可能会出现Windows 的 Linux 子系统的文件同步和 Windows 不是实时的问题(来自 https://www.zhihu.com/question/318832524/answer/641951256 )
你可以在Windows下存储文件,然后在wsl中使用/mnt/盘符/路径 访问
你也可以在1903更新发布后在Linux rootfs中存储文件,Windows程序使用\wsl$\Ubuntu\unix路径 访问
唯独不正确的操作是找到AppData里rootfs文件夹直接用Windows程序修改,因为这里面的文件在NTFS中除了存储文件内容,Windows文件元数据,还存储unix文件元数据(比如rwx权限,unix用户组和用户),你创建的文件并不具有这样的属性,因此会导致权限混乱。
1903(19H1,20195月更新)的改动
Linux Files inside of File Explorer
The best way to get started with this feature is to open your Linux files in File Explorer! To do this, open your favorite distro, make sure your current folder is your Linux home directory, and type in:
1 | explorer.exe . |
来自 https://devblogs.microsoft.com/commandline/whats-new-for-wsl-in-windows-10-version-1903/
npm淘宝源的问题
这玩意有毛病,经常会出奇奇怪怪的bug,最好的方式还是挂代理
C盘用户文件夹下的.npmrc
1 | proxy=http://127.0.0.1:1081 |
github action错误提示
How to fix ‘Unsupported platform for [email protected]: wanted {“os”:”darwin”,”arch”:”any”} (current: {“os”:”win32”,”arch”:”x64”})
解决办法:
在deploy.yml中添加
npm i -f
参考:
[语雀+TravisCI+Serverless]: https://segmentfault.com/a/1190000017797561
[【持续更新】最全Hexo博客搭建+主题优化+插件配置+常用操作+错误分析]: https://www.simon96.online/2018/10/12/hexo-tutorial/
[使用Travis CI自动部署Hexo博客]: https://www.itfanr.cc/2017/08/09/using-travis-ci-automatic-deploy-hexo-blogs/
[hexo-theme-butterfly安裝文檔]: https://jerryc.me/posts/21cfbf15/
[Hexo 博客终极玩法:云端写作,自动部署]: https://segmentfault.com/a/1190000017797561